Fellow Visual Studio developers, this document is a step-by-step guide to the
process of creating an installation package that will comprise your ASP.NET 3.5
or 2.0 web application and redistributable components of HttpVPN Proxy and
UltiDev Cassini Web Server.
The content of this guide assumes that the reader is familiar with the
following topics:
- Developer's Guide: The Overview.
- Developer's Guide: Creating Your Web App
Store.
- Developer's Guide: Creating
Application's Release Definition and managing product lines.
- Developer's Guide: Installer Creation
Overview.
If you have experience creating UltiDev Cassini-based
redistributable intranet
apps, this guide will contain lots of familiar steps, along with some
important differences.
Here we will use a simple two-page ASP.NET web application project as an
example. The sample app is a standard ASP.NET web application of a "Hello,
World!" type. We will use it to show how any existing ASP.NET application can be
converted into a secure, self-hosting Internet apps in a matter of just a couple
of hours.
The high-level flow of the process of converting an existing ASP.NET application
into a secure, redistributable and HttpVPN-hosted web app accessible on the
Internet, consists of following steps:
- Adding of a Setup project to the solution that already has ASP.NET application.
- Adding HttpVPN Proxy as a prerequisite to the Setup project so that installation
bootstrapper (Setup.exe) could download and install HttpVPN Proxy like other
prereqs you may have (.NET Framework, UltiDev Cassini Web Server, SQL Server
Express, etc.) before installing your app.
- Implement installer custom actions that will start the process of registering
your app with HttpVPN service at the end of the installation.
- Creating self-extracting, single-file installation EXE.
In order to be able to complete this walk-through, you will need following tools
and components:
- Microsoft Visual Studio 2008 or 2005. Visual Studio 2010 is not supported yet.
Express editions of Visual Studio are not supported.
- HttpVPN Proxy prerequisite for
Visual Studio.
- If your target audience is not guaranteed to have Microsoft IIS installed, as
it's almost always the case, please use
UltiDev Cassini Web Server
prerequisite for Visual Studio. UltiDev Cassini is a lightweight
redistributable web server capable of running ASP.NET applications.
- An ASP.NET web application to practice installation creation with. You may
download sample ASP.NET 2.0 project (VS
2008 version, and
VS 2005 version) that will be used throughout this walk-trough.
- Your Web App Store needs to be set up at
the HttpVPN Portal, complete with the product line definition, target platform
definition and release definition for your app.
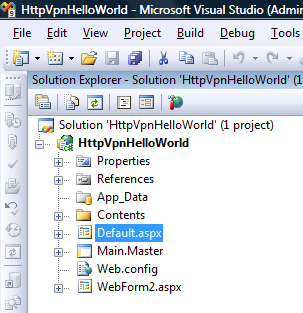
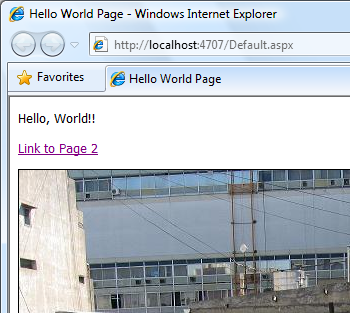
Please start with opening an existing ASP.NET web application in Visual Studio
2008 or 2005. This screen shot shows our above-mentioned sample ASP.NET project
opened in Visual Studio 2008 and running in IE:
This project contains two simple pages linking to each other, as well as a few
content files, including an image, a JavaScript file and a CSS file. This sample
ASP.NET project is not optimized in any way for HttpVPN.
If you are using Visual Studio 2005 and your ASP.NET project is of the
"ASP.NET Web Site", consider converting it into
ASP.NET Web Application, because Web Site projects require either
code-behind files to be deployed, or employing awkward precompilation process.
Visual Studio 2008 developers need to worry about this problem only if your
project was a web site app migrated from Visual Studio 2005 into VS'08. If it
was, the fix is the same - conversion to Web Application. Sample apps used in the walk-through are both of the Web
Application type.
First, let's ensure that assembly file version number is incremented every
time the project is built. This is important for the upgrade mode of the
installation, especially for installers made with Visual Studio 2008. Unlike
installers created by Visual Studio 2005, when new version of an app is
installed in the same folder as the old one, MSIs generated by VS'08 will
replace executable files only if new ones have higher version number. Installers
generated by Visual Studio 2005 act in upgrade mode more or less as if old
version is uninstalled before new one is installed.
To take care of this new behavior of VS'08 installer, please
open AssemblyInfo.cs file in the Properties folder and modify AssmeblyVersion
attribute value.
// You can specify all the values or you can default the
Revision and Build Numbers
// by using the '*' as shown below:
[assembly: AssemblyVersion("1.0.*")]
Incrementing version number automatically on every
build may not be
necessary, although it's a good practice. If you wish, you may forgo
auto-incrementing and instead change the version number manually before
releasing the application.
Now we'll add a Setup project to the solution: 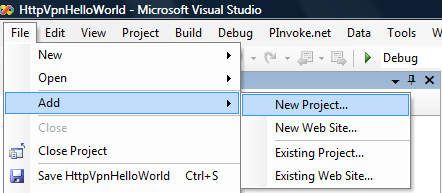
Since Microsoft IIS is not installed by default on most Windows machines, we
recommend employing free, redistributable UltiDev Cassini Web Server instead of counting on IIS
being present on the target PC.
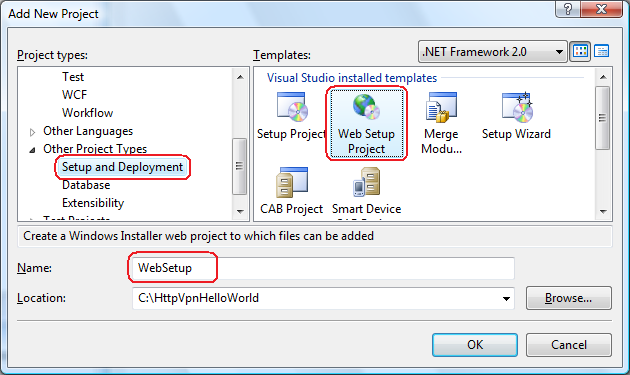
If you decided to go with UltiDev Cassini Web Server, please add a new
regular (non-web) Setup project to the solution:

If you decided that your end users won't mind getting IIS installed on
the target system, you may choose Web Setup project instead:
Please note that even though most important differences between Cassini- and
IIS-targeting are covered throughout this walk-through, from this point forward
this guide is describing how to create an installer using UltiDev Cassini Web
Server, unless stated otherwise.
Once setup project was added, please ensure that it is going to be built. For
that right-click the solution item and select "Configuration Manager"
item. There check the "Build" checkbox for your setup project for the
Release build configuration:
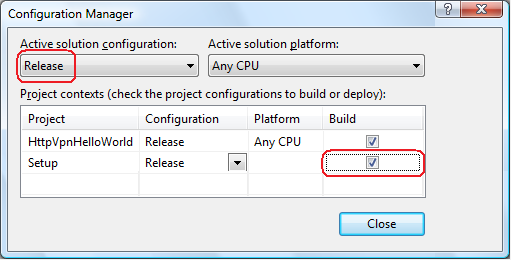
Building Setup project in Debug configuration is not necessary. If you choose
not to build Setup project in Debug configuration, please switch to the Release
configuration for the rest of the walk-through.
Now let's add setup project prerequisites and give meaningful name to the output
MSI file. For that please right-click setup project and select Properties menu
item:
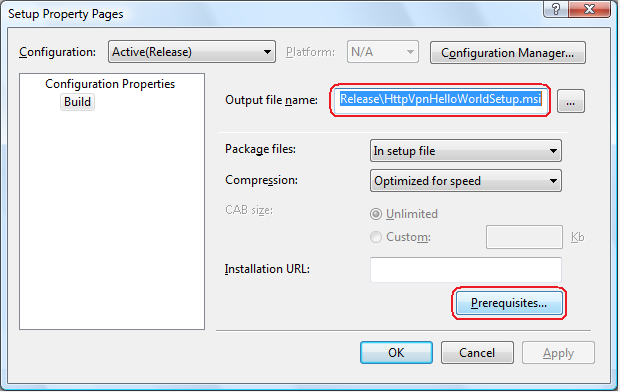
Click Prerequisites button to bring up prereqs window:
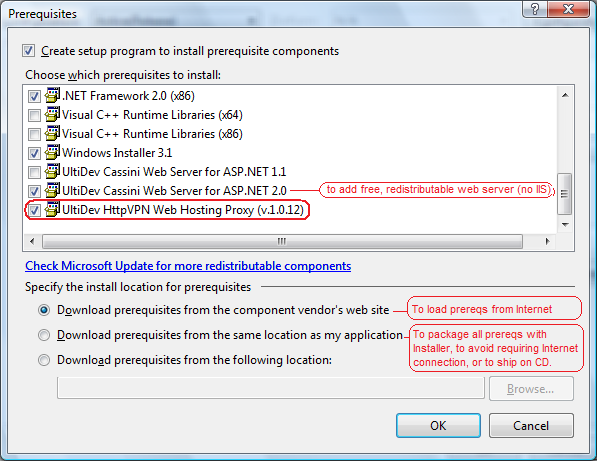
Be sure to include
- UltiDev HttpVPN Web Hosting Proxy,
- An appropriate .NET Framework version (sample project uses .NET 2.0),
- Windows Installer 3.1, and
- If your target systems are not guaranteed to have IIS installed (as it is in
most cases), include UltiDev Cassini Web Server.
If you don't see HttpVPN Proxy in your Visual Studio prerequisite list as shown
on the screenshot above, please download and install it using the first link
on the HttpVPN™ Proxy download
page. If you don't see UltiDev Cassini among the prerequisites, please
download and install it from
Cassini download page. Also, please note that selected radio-button in the "install
location for prerequisites" will generate setup package that will download
missing prerequisites from the Internet during installation, instead of
including them into the setup project, making installation package smaller, but
requiring Internet connection. Click OK button to close dialogs.
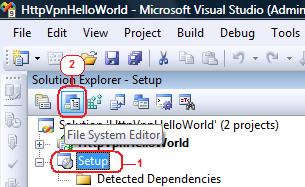
Now we need to add web application files to the setup project. Please start with
opening setup project's File System Editor by, first, selecting setup project in
the Solution Explorer pane, and then clicking the "File System Editor" button on
the toolbar:
Before we add any application files to the setup package, it's a good idea to
place web application files in its own subfolder, because the installation
package will eventually contain some other files, and it makes sense to keep web
application files separate from other files.
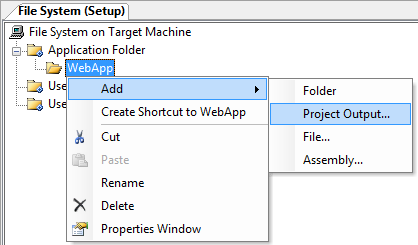
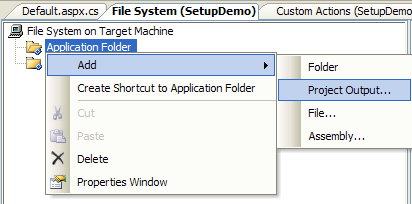
In the File System Editor window, please right-click "Application Folder" and
select Add | Folder, and give new folder "WebApp" name. (If you name it
something else, you will need to update the folder name in the Installer1.cs
file later in the process.)
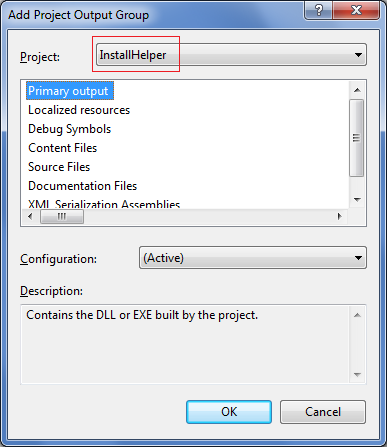
Now, right-click "WebApp" folder and select Add | Project Output...
In the dialog that will have appeared, select at least "Primary output" and
"Content Files". Do not select "Source Files" because ASP.NET Web Application
type of project compiles code-behind files into the DLL that will be added to
the installer as a "Primary output".

Click OK button to close the dialog.
>> Visual Studio 2005 Step
If you are using Visual Studio 2008, please
skip to the next step. Developers using VS'05, let's add Bin folder to the
target folder. In the File System Editor window, please right-click "Application
Folder", select Add | Folder, then type in Bin and hit Enter.
Move "Primary Output" from WebApp to the Bin folder:
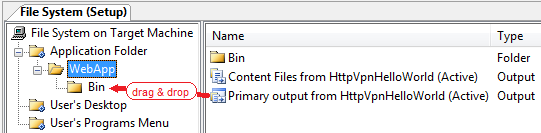
>> End of Visual Studio 2005 Step
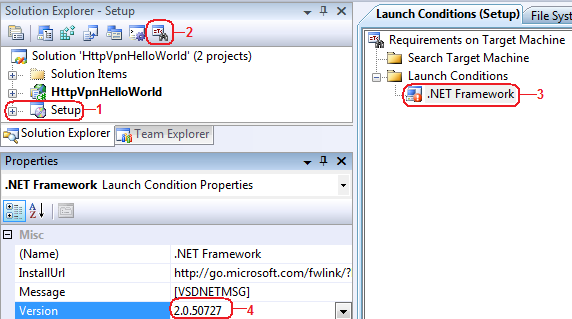
Please be sure to check which version of the .NET Framework the installer will
be looking for as a Launch Condition in order to start the installation. (The
version of the .NET Framework selected among the prerequisites is not related to
the "launch conditions" version of the framework.) To set "launch conditions"
framework version please 1) select Setup project in the Solution Explorer pane,
then 2) click "Launch Conditions Editor" tooltip on the toolbar, then 3) select
.NET Framework item in the Launch Conditions pane, finally 4) select .NET
Framework version matching the one selected as a the prerequisite:
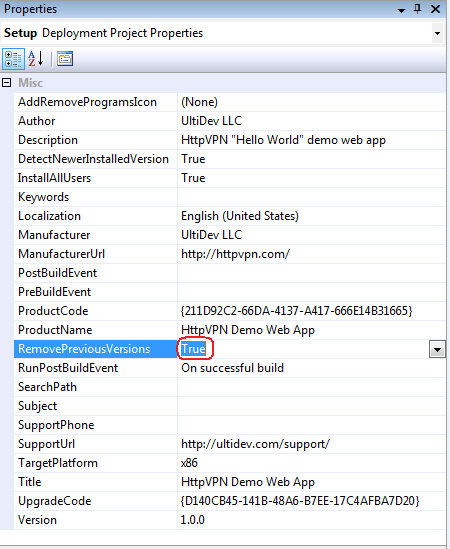
Let's do some housekeeping and update setup project settings that were left
unchanged since project was created. The most important setting for the future
is to set RemovePreviousVersions to True. Others are less consequential.
If you compile the solution at this stage and run generated Setup.exe (not the
MSI or "Install" menu item), you will see that all the components, like HttpVPN
Proxy and UltiDev Cassini Web Server, as well as your application itself, are
deployed fine, but your application files simply sit there. Your app is not yet
hosted by a web server (unless your app targets IIS) and is not accessible on
the Internet via HttpVPN service. To do the magic of registering your app with
both Cassini Web Server and HttpVPN Proxy, custom installer actions need to be
created. (If you have built and installed the package, please uninstall it
before going forward.)
Implementation of custom actions will be different depending whether you are
targeting IIS or UltiDev Cassini. The major difference is caused by the fact
that for IIS, the URL of the application is likely to be
known at the design time, and will be something like
http://machinename/appUniqueVirtualFolder/Default.aspx. With Cassini, on
the other hand, the URL of the app will be established only at the
installation time because current version of Cassini does not support
virtual directories and uses unique port numbers for each application, making
application's URL look something like http://machinename:1234/defaul.aspx. Any
particular port number, however, is not guaranteed to be free when your
application is installed on user's PC, making specifying hard-coded static port
number at the design time risky, if you plan distributing the application to the
masses. Because of all this, when applications register themselves with UltiDev
Cassini Web Server, they let Cassini find and assign free TCP port, thus
shifting URL determination to the installation time, instead of design time.
This all will make custom actions for IIS and static-port case of Cassini
relatively straightforward to implement, because in both cases the URL of the
app will be know at the design time. The most common
case, however, will be where Cassini Web Server determines app's URL at the
installation time, so the newly minted URL will be used when registering the app
with HttpVPN. If you don't have UltiDev Cassini components installed, you
can
download Cassini
here.
If you're familiar with redistributing ASP.NET with UltiDev Cassini, where
adding custom actions does not require any coding, you will notice that shipping
your application with both UltiDev Cassini and HttpVPN Proxy will require a
little bit of coding to implement custom action logic.
Let's start with adding a little new Class Library project to the solution where
installer's custom action will reside. Please right-click the solution item in
the Solution Explorer and select Add | New Project. Select Class Library as a
project type and name the project something like InstallHelper:
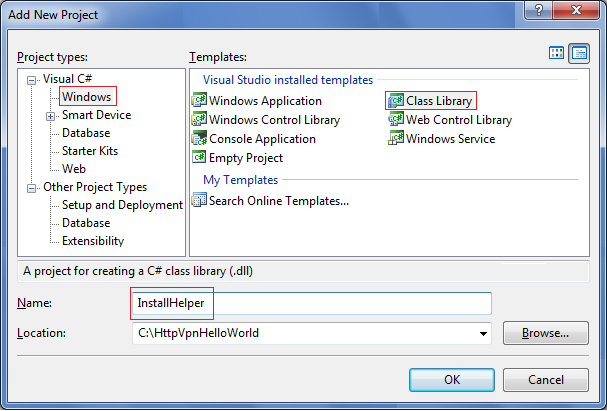
Click OK to get new project added to the solution. Remove the dummy Class1.cs
class from the solution.
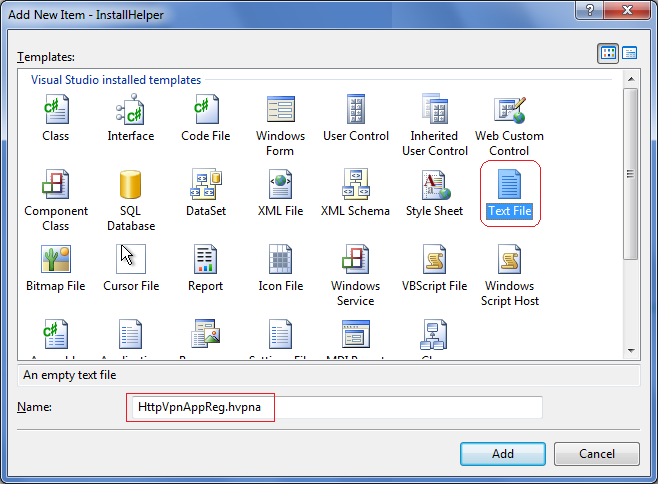
Next step is to add an .HVPNA file to the project. Files with ".hvpna"
extension are associated with HttpVPN Proxy Registration utility and contain web
application settings such as local URL and app release ID. The file you add at
this stage will be empty, because it will be filled out
programmatically during
the installation, as shown further in the guide. Please right-click the
InstallHelper project in the Solution Explorer, select Add | New Item, and then select Text File from the
Templates list, and name the file HttpVpnAppReg.hvpna.
If you decide to give the file some other name, you will need to modify the
value of hvpnaFile constant in the installer custom action implementation, as
described later in this guide. This newly-created .hvpna file will remain
blank because it will be modified programmatically at installation time by
custom actions code.
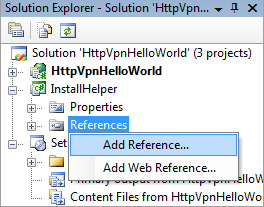
Now let's add a reference to UltiDev Cassini registration & configuration API
assembly to the InstallHelper project:
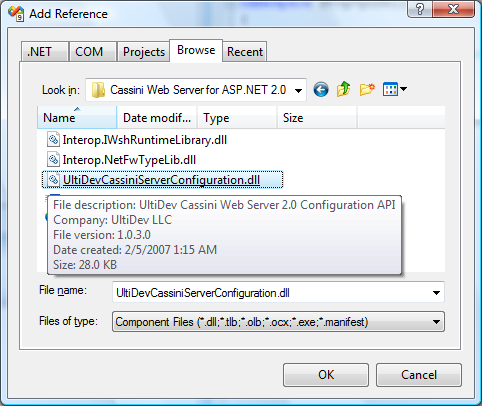
...and then browse to "C:\Program Files\UltiDev\Cassini Web Server for ASP.NET
2.0" folder (on x64
systems path will be "C:\Program Files (x86)\UltiDev\Cassini Web Server
for ASP.NET 2.0") to add reference to UltiDevCassiniServerConfiguration.dll
file:
Now an installer class has to be added to the
InstallHelper project.
Right-click InstallHelper in the Solution Explorer, select Add | New Item from
the menu, and add an installer class named Installer1:

Please be sure to name the class something other than "Installer", or it will create a
conflict with another Installer class defined in one of .NET Framework
namespaces.
Now please open code-behind file of the Installer1.cs by right-clicking the
Installer1.cs and selecting View Code menu item. Please open this
Installer.cs
sample, and copy & paste its content over the default Installer1.cs
source:
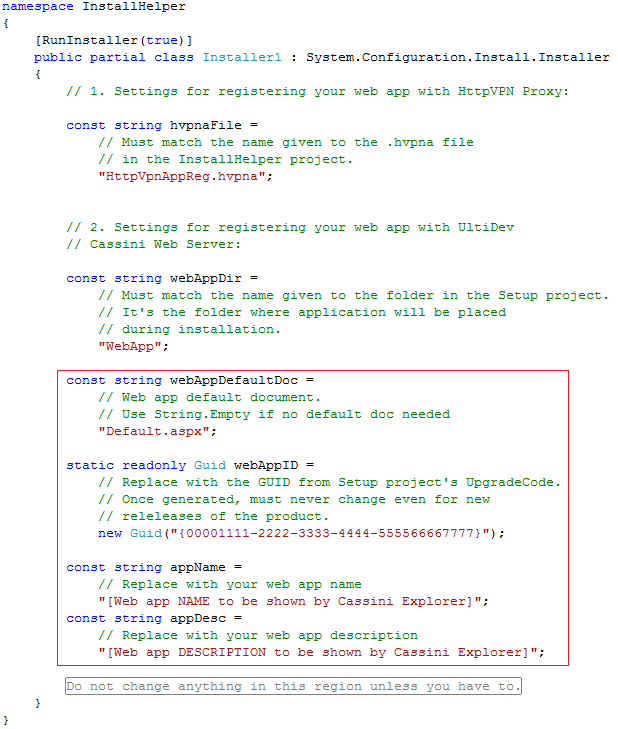
You most likely will need to change constant values in the
highlighted section
- UltiDev Cassini Web Server application
registration parameters. (Other
constants, hvpnaFile and webAppDir may need to be changed only if you didn't use
names suggested earlier in this guide.) Application's
name and description values will show up on the Cassini Explorer page after the app is registered
with UltiDev Cassini Web Server. WebAppDefaultDoc value is the path to the
default document relative to the web app root. And application's webAppID GUID could be pretty
much any new GUID, but it's recommended to use Setup
project's UpgradeCode property value. Once you chose the webAppID value, it should never change throughout the
entire lifetime of the product line, even as you create and release new versions of your
application - just like UpgradeCode of your installer won't change.
Build the project to ensure there are no build errors.
Now let's ensure InstallHelper project participates in the installation process. Please select Setup
project in the Solution Explorer and then click on the File System Editor icon:
Then right-click Application Folder in the right-side pane and select Add |
Project Output:
And select Primary Output of the InstallHelper project:
Click OK.
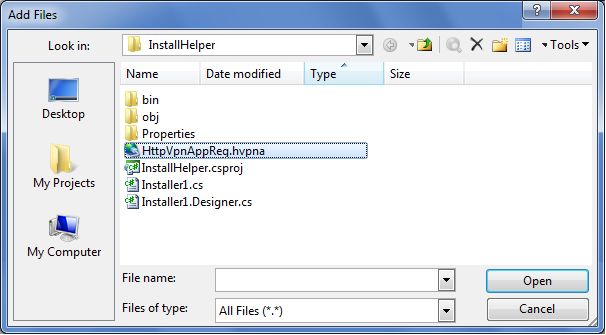
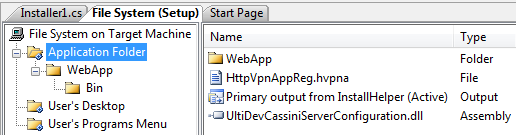
Now HttpVpnAppReg.hvpna file needs to be added to the Application Folder of the
Setup project. To do that, right-click Application Folder, select Add | File,
navigate to the location of the file, select it and click Open
button:
Please keep in mind that if you decide to put HttpVpnAppReg.hvpna file in some
other folder, please be sure to update the UpdateHvpnaFile() function in the
Installer1.cs accordingly. Sample implementation of Installer1.cs assumes that
HttpVpnAppReg.hvpna file is located in the Application Folder of the Setup
project. Once the file is added, your Application Folder should look like this:
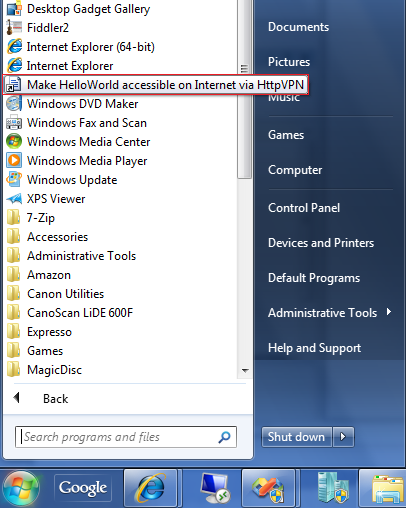
To complete HttpVpnAppReg.hvpna file installation sequence, it's necessary to
create a shortcut to the .HVPNA file and place the shortcut into the User's
Program Menu folder. To do that, right-click HttpVpnAppReg.hvpna file in the
Application Folder of the File System Editor, and select "Create Shortcut to
HttpVpnAppReg.hvpna" and give it a name you would like to see in the Programs
menu. For example, "Make HelloWorld accessible on Internet via HttpVPN". After
that move the shortcut to the User's Program Menu folder:

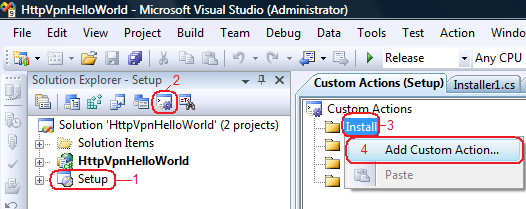
Now it's time to make installer call custom actions code. To do that, open Custom
Actions window of the setup project, right-click Install step and select
"Add Custom Action..." menu item:
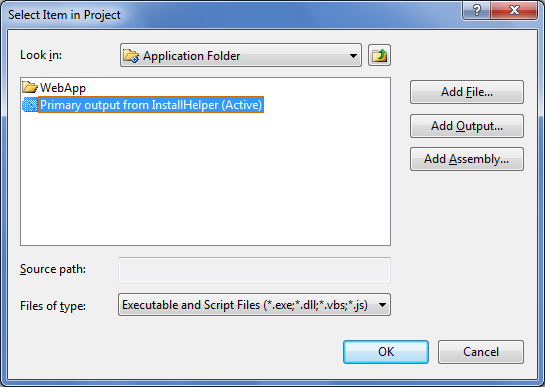
...navigate to the Application Folder and select "Primary Output from
InstallHelper...":
Repeat the step above for each type of custom action:
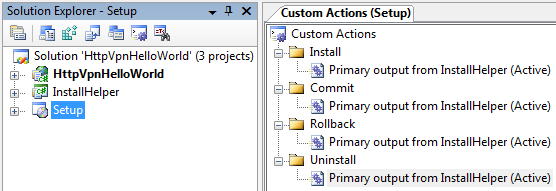
This will ensure that installer will call Install(),
Uninstall(), Commit() and
Rollback() methods of Installer1.cs in the InstallHelper project.
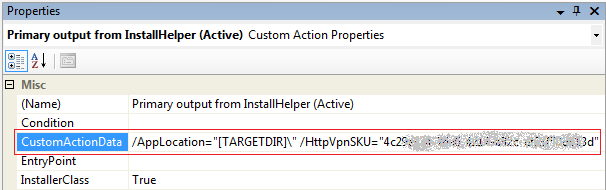
Select "Primary Output..." item of the Install custom action and
set CustomActionData property to
/AppLocation="[TARGETDIR]\" /HttpVpnSKU="<Your app release
ID>". Actual release ID value for your product can be found by clicking "Proxy Reg Info" link and then
finding the value of the /SKU command line parameter on the
Registration command
line pop-up on the Release Management screen at your
Web App Store.
This way installer will pass AppLocation and HttpVpnSKU parameters to Install()
method of the Installer class.
Please do not forget to change the value of /HttpVpnSKU
parameter of the Install step
every time you publish a new release at your Web App Store!
Now you may build the entire solution,
create a test order and
test-run the installation. Please ensure that at the end of your application's
installation, HttpVPN app registration flow was started as described in
User's Guide.
Also, it's a good idea to test whether the HttpVPN app registration shortcut was
created and whether is works:
Once you get the application accessible both locally and on the web via HttpVPN
portal, compare the HTML
source of the home page when it's served directly by a web server, and then compare it
with the HTML rendered by HttpVPN. You will see something like this:
|
Page Served by Web Server |
Page Served via HttpVPN |
<form name="aspnetForm" method="post"
action="Default.aspx" id="aspnetForm">
<div>
<p>Hello, World!!</p>
<p><a href="WebForm2.aspx">Link to Page 2</a></p>
<p>
<img border="1"
src="Contents/RoofsOfBuenosAires.jpg"
style="width: 648px; height: 486px" /></p>
</div>
</form> |
<form name="aspnetForm" method="post"
action="https://MyOwnSecureWeb.com/
08a2e66d-c5df-4383-bf8b-78147a179c7a/
UdVpnRGVmYXVsdC5hc3B4/SecureTunnel.axd"
id="aspnetForm">
<div>
<p>Hello, World!!</p>
<p>
<a href="https://MyOwnSecureWeb.com/
08a2e66d-c5df-4383-bf8b-78147a179c7a/
UdVpnV2ViRm9ybTIuYXNweA==/SecureTunnel.axd">
Link to Page 2</a></p>
<p><img border="1"
src="https://MyOwnSecureWeb.com/
08a2e66d-c5df-4383-bf8b-78147a179c7a/
UdVpnQ29udGVudHMvUm9vZnNPZkJ1ZW5vc0FpcmVzLmpwZw==/
SecureTunnel.axd"
style="width: 648px; height: 486px" />
</p>
</div>
</form>
|
To ensure your application works alright in the upgrade mode, please do
following:
- Increment the value
of the Version property of the Setup project - in this case set it at 1.0.1.
- Accept changed ProductCode.
- Create new Release at the App Store.
- Create new test order using Release management screen of the App Store.
- Plug new release ID as a parameter of the Install custom action.
- Build the solution and install it without uninstalling previous
version.
Visual Studio Setup project creates two-file installation package: one file is
Setup.exe bootstrapper, and another is the MSI file. In order to ensure that
prerequisites are installed, both files must be distributed, and launching
Setup.exe must be the starting point of the installation, since it's Setup exe
(not MSI) that downloads and installs prerequisites like HttpVPN Proxy.
HttpVPN App Store requires that entire installation package is be placed in a
single file. Although it's possible to create a ZIP archive of your app installation
package, including both Setup.exe and the MSI file, and publish it to the App
Store that way, we recommend creating a self-extracting archive that launches
installation after unpacking itself.
7-Zip is a
free archiver
that works well for the purpose. Here we show how to use 7-ZIP in order to
automatically create a single self-extracting EXE archive as a part of the
solution building sequence.
Please start with creating following solution folders:
Next, using Windows Explorer create folder called "SFX" in the solution folder:
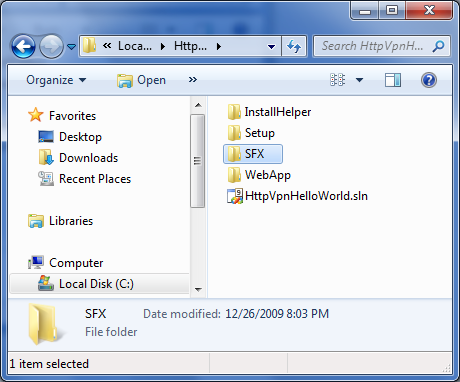
Open SFX folder and extract this archive
with 7-ZIP components content into it:
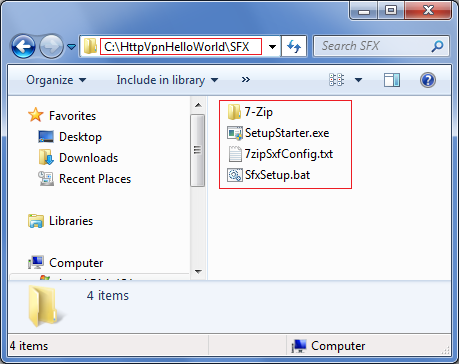
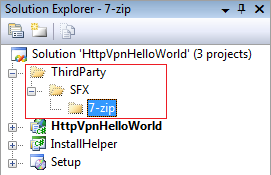
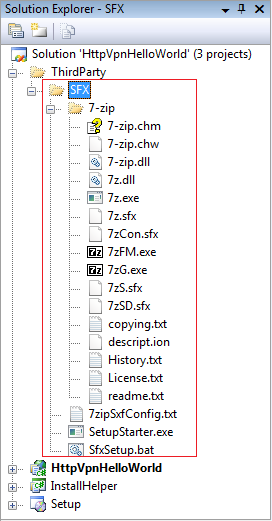
Go back to Visual Studio, right-click "SFX" solution folder and select Add |
Existing Item. Using Open File window, Navigate to the SFX folder shown above
and add three files: SetupStarter.exe, 7zipSxfConfig.txt and SfxSetup.bat. Next,
right-click "7-zip" solution folder, select Add | Existing Item, and add all
files from the SFX\7-zip folder:
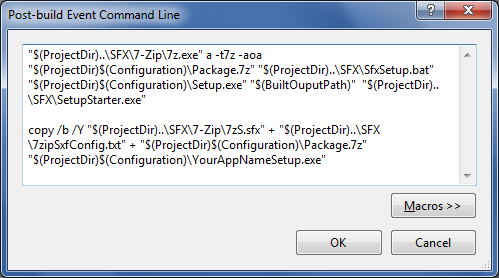
Finally, select Setup project in the solution explorer and in the Properties pane
select PostBuildEvent. Hit "..." button at the end of the property value line
and paste these two commands:
- "$(ProjectDir)..\SFX\7-Zip\7z.exe" a -t7z -aoa
"$(ProjectDir)$(Configuration)\Package.7z" "$(ProjectDir)..\SFX\SfxSetup.bat"
"$(ProjectDir)$(Configuration)\Setup.exe" "$(BuiltOuputPath)"
"$(ProjectDir)..\SFX\SetupStarter.exe"
- copy /b /Y "$(ProjectDir)..\SFX\7-Zip\7zS.sfx" +
"$(ProjectDir)..\SFX\7zipSxfConfig.txt" +
"$(ProjectDir)$(Configuration)\Package.7z" "$(ProjectDir)$(Configuration)\YourAppNameSetup.exe"
Please replace highlighted portion with more meaningful name for the final
output EXE file, but be sure to keep words "Setup" or "Install" as part of the
name - they will tell Windows 7 and Windows Vista to pop up Administrator
privileges request when program is launched, w/o having to create and
embed the
manifest into the EXE.
PortBuildEvent window should look like this:
These commands assume that Setup project folder and SFX folder have the same
parent folder. If not, it will be necessary to modify commands by replacing
"$(ProjectDir)..\SFX\" with appropriate path.
Once you build the solution, the Release folder of the Setup project will look
like this:
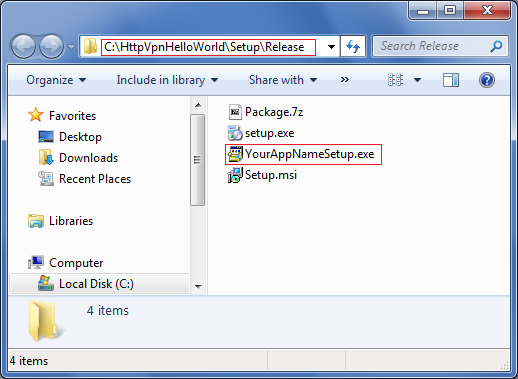
YourAppNameSetup.exe SFX archive is completely self-contained and does not
require the presence of any other files in the folder shown above. Starting
YourAppNameSetup.exe causes it to unpack itself and launch Setup.exe, which in
turn will ensure that prerequisites are installed before starting MSI package
installation.

|