Summary of Application Access Control Features
Please note that changes in security settings may take about 15 minutes
to take effect.
HttpVPN allows you to specify who should have Internet access to your
applications. (HttpVPN controls access only from the Internet. Access to web
apps by clients from inside-the-LAN is not affected by HttpVPN in any way.) By default, when an application has been registered with
one of your HttpVPN Proxies to become accessible on the Internet, only you (and
people who are designated as this Proxy admins) will have access to the
application.
However, applications' access control settings can be changed to
grant application access rights either to everyone, or
to people you trust.
Former is equivalent to making your web application a public web site, where
anyone with a browser can access your app at HttpVPN Portal without even logging
in. Latter is similar to how you invite
friends to your social networks like Facebook, but in contrast to social
networking sites where there is only one group of authorized users - "Friends", HttpVPN
provides much more flexible and fine-tuned access control model based on app
administrators' ability to give different groups of
people access to different applications.
HttpVPN uses group-based access rights model.
This means that application access rights are granted to user groups, and not to
individual users. People in turn get assigned to user groups, and the
intersection of user group membership with access rights granted to groups
determines whether a user can access given application. Users can be members of
multiple user groups, and multiple groups can be granted access to an
application. In order to have access to an application, user has to be a member
of at least one group that has access to the application.
Making an application accessible to a trusted user is done an a two-step
process: 1) making a user member of one or more user groups, and 2) granting
access to the application to one or more user groups. These two steps are not
always a part of the same flow because step 2 is usually done once right after an
application is registered with the HttpVPN, while people may be invited &
assigned to user groups completely independently.
Unlike social networking sites, where inviting a user is equivalent to
authorizing him or her to have access to your profile, HttpVPN portal user
may belong to multiple user groups. Therefore, the invitation process has
two steps: 1) invitation itself, and 2) assigning the user to one or more user
groups.
Inviting a User Walk-Through, Part 1: Extending an Invitation
User access control information is maintained separately for each HttpVPN Proxy
you have registered, meaning that in order to invite someone, you need to have a
least one Proxy registered to your account.
Also, if you are an owner/admin of multiple HttpVPN
Proxies, you will have to set up access rights for each Proxy.
- Go to HttpVPN Portal home page, be sure to log in
and then hover the mouse cursor over the
 icon next to Proxy's Status indicator. icon next to Proxy's Status indicator.
- In the popped-up menu click the "Invite People to This Network" item:

It will take you to the "LAN Access Rights" page.
- On the "LAN Access Rights" page click “Invite someone to access applications in
this network” link and fill out invitation form with your friend’s info.
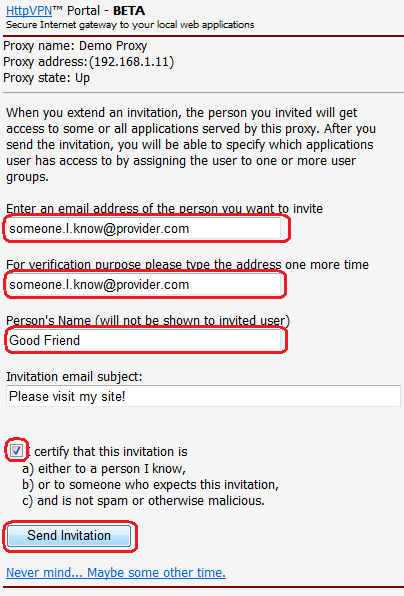
Click Send Invitation button to email the invitation.
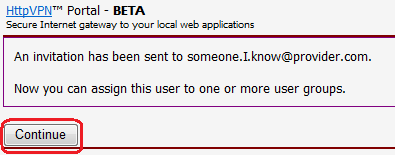
- You will see the message saying that the
invitation was sent to the addressee.
The person you are inviting will receive the email message from HttpVPN
informing that you have invited him/her to use your applications. If the person did not have an account with the Portal, a new account will be created, with the email
address you have provided serving as a user name, and a temporary password sent
along with the invitation.
Clicking Continue button will take you back to "LAN Access Control" page, but
this time the person you have just invited will be listed among invited users.
At this point the person you have invited will be able to log in to HttpVPN
Portal, but she will not see any links to your applications just yet, because
she's not a member of any user group. Next step explains how to assign a
user to user groups.
Inviting a User Walk-Through, Part 2: Making User a Member of User Groups.
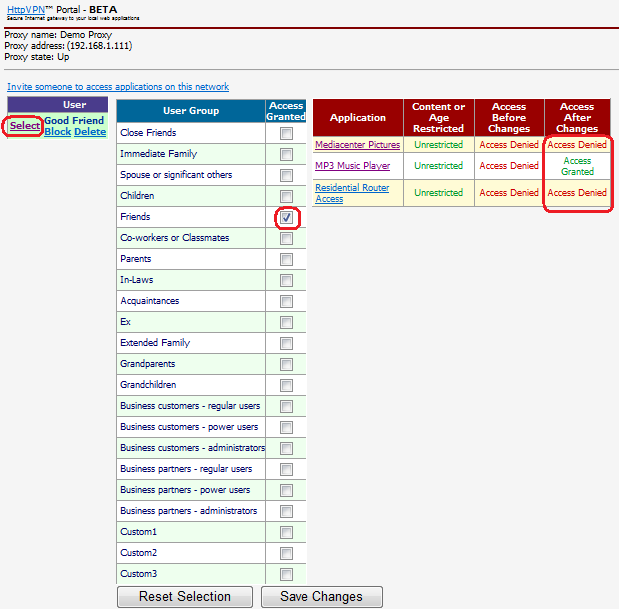
The process of assigning a user to one or more user groups is pretty
straightforward: select a person from the user list on the left and then check
groups where this person belongs. After marking
each box, list of
applications on the right will be updated to show which applications will be
accessible and which ones will not be accessible to that person after you save the
changes.
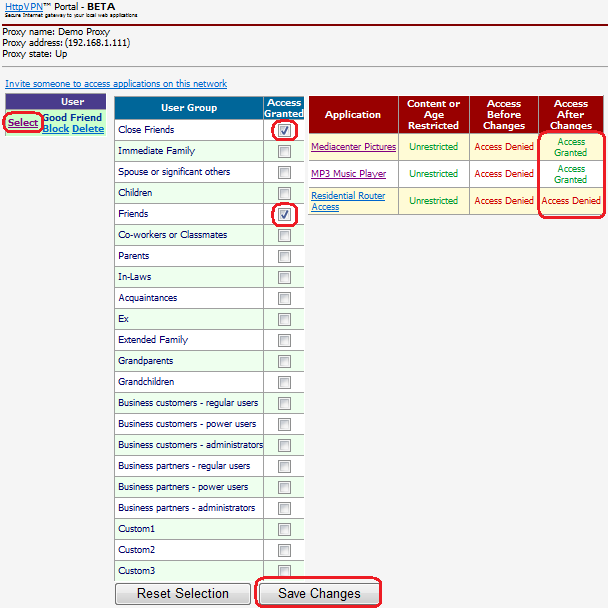
Screenshots below illustrate the case where two applications, "MP3 Music
Player" and "Mediacenter Pictures", are
accessible to two different groups of users: "MP3 Music Player" is
accessible only to Friends, while "Mediacenter Pictures" is accessible only to
Close Friends group.
First, once Friends group is checked off, Applications list will show that "MP3
Music Player" application becomes
accessible to the selected user, while all other apps remain inaccessible.
Second, once the user is made a member of Friends and Close Friends groups, "MP3
Music Player" and "Mediacenter Pictures" apps will become accessible, while
"Residential Router Access" app will remain off-limits for everyone but managers
of the Demo Proxy.
To persist user groups membership changes, click Save Changes button, and
"Access Granted" indicator will appear in the "Access Before Changes" column of
the Applications list.
As mentioned earlier, changes in security settings may take up to 15
minutes to
take effect due to caching of ACL information by the Portal.
As mentioned above, applications can be made accessible on the Internet to users other than proxy
admins. That is done at the Application Properties page. You will end up on this
page either immediately after you have finished
registering an application
manually, or after you have installed a
redistributable HttpVPN-enabled application.
In order to grant user groups access to an application, an HttpVPN Proxy has to be created and one
or more applications have to
be registered with the Proxy.
To navigate to the Application Properties page manually, please log in to the
Portal and on its home page hover the mouse cursor over the
 arrow next to the application you wish
to make accessible to people you trust. Click Application
Settings and Security
item in the popped up menu. arrow next to the application you wish
to make accessible to people you trust. Click Application
Settings and Security
item in the popped up menu.

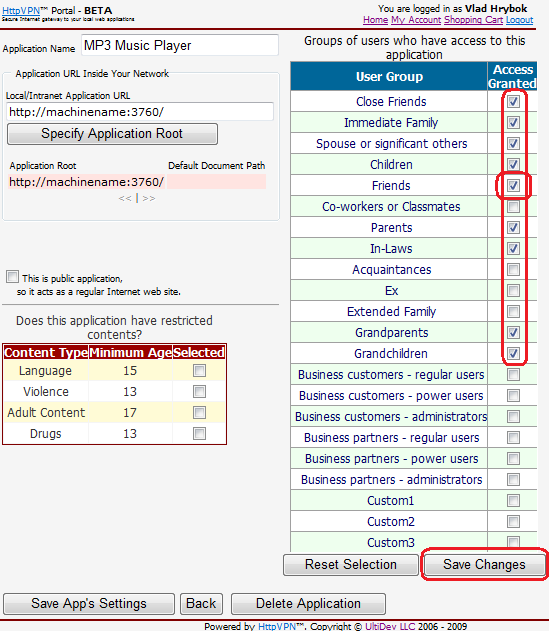
At the Application Properties page all you need to do is check user groups that
should get access to the application, or if you decided to revoke some groups'
access rights to the app, you can uncheck the groups and press Save Changes
button to persist changes.
Please note that changes in security settings may
take up to
15 minutes to take effect.
Once you have saved changes to the application access control settings, you may
want to invite people you trust to your network and
grant them access to your applications, if
you didn't do that already.

|