Welcome to UltiDev Cassini Web Server for ASP.NET
distribution walkthrough! This document explains how to
create a Visual Studio .NET 2003 solution that will
include an ASP.NET 1.1 application project and a Setup
project for installing the application along with UltiDev
Cassini Web Server on a target machine.
The process of creating a setup project for an
ASP.NET 2.0 application is slightly different and is
described in the
corresponding
article.
Conceptually, creating a redistributable package
for an ASP.NET 1.1 application including UltiDev Cassini
consists of the following steps:
- Create a regular, non-web, setup project and add it to
the solution that has ASP.NET application;
- Add custom actions to the setup project that register
the ASP.NET application with Cassini after installation
and unregister during uninstallation;
- Replace original Setup.exe bootstrapper generated by
Visual Studio .NET 2003 with the bootstrapper provided
by UltiDev.
This will create a distribution package that will
ensure that the latest version of UltiDev Cassini Web
server is deployed and started on the target machine
before your application is installed.
IMPORTANT NOTE: The process described in this
article generates Setup.exe bootstrapper that requires
.NET Framework 1.1 to be installed on the target
machine. Running generated Setup.exe on a machine that
doesn't have .NET Framework will interrupt installation
with an error.
This walkthrough assumes that UltiDev Cassini Web
Server for Visual Studio .NET 2003 Developers is
installed and that you have an existing
solution with an ASP.NET application opened in Visual
Studio .NET 2003 IDE. In the end you will have a project
closely resembling the
sample
project we provided for Visual Studio .NET 2003.
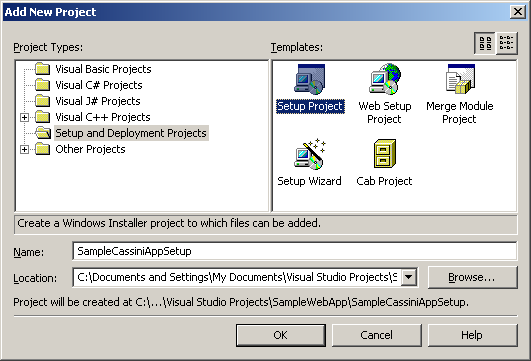
-
First thing to do is to add a new setup project to your
existing ASP.NET web application solution. Please select
File | Add Project | New Project menu item and add a new
regular Setup project to the solution:
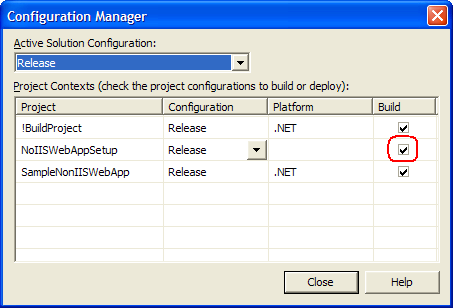
- Ensure that your setup is going to be built. For that
right-click the solution and select Configuration
Manager. There check the "Build" checkbox for your setup
project for at least a Release build configuration:
-
Add your application files to the setup project.
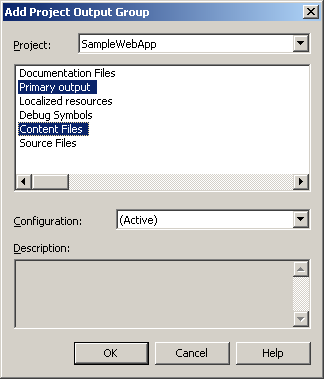
- Add UltiDevCassiniServerConfiguration.dll to the Setup project.
UltiDevCassiniServerConfiguration.dll assembly is a part of UltiDev
Cassini package and contains custom installer class
that can be invoked from a Setup project to register or
un-register an ASP.NET application with UltiDev Cassini.
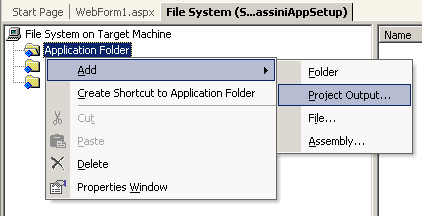
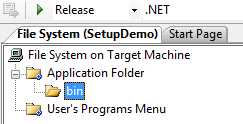
To add UltiDevCassiniServerConfiguration.dll to your Setup project,
using Setup project's File System View, create Bin
folder under the Application Folder:
Then right-click on Bin folder and select Add |
Assembly... In the Open File dialog navigate to UltiDev
Cassini folder, which is usually "C:\Program
Files\UltiDev\Cassini Web Server for Visual Studio .NET
2003 Developers" (in older versions it could
be "C:\Program
Files\UltiDev\Cassini Web Server for ASP.NET 1.1")
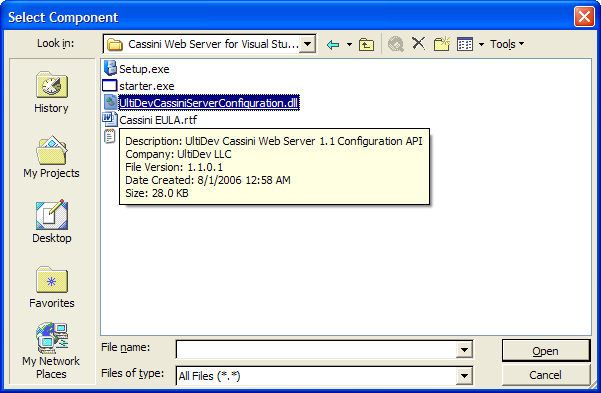
... and pick the UltiDevCassiniServerConfiguration.dll.
UltiDevCassiniServerConfiguration.dll contains routines
that register and unregister ASP.NET applications with
UltiDev Cassini.
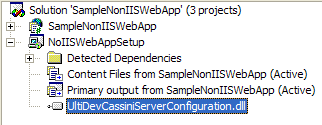
After you have added UltiDevCassiniServerConfiguration.dll, your
Setup project will look like this:
- Next step is to hookup installer class located in
UltiDevCassiniServerConfiguration to your setup
project's custom installer actions, which will register
and unregister your ASP.NET application with Cassini
during installation and uninstallation.
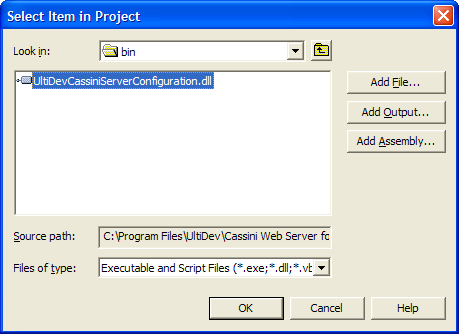
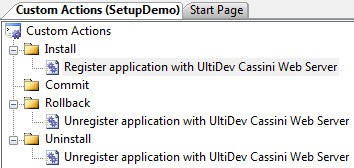
Start with creating Install, Rollback and Uninstall
custom actions in the Setup project pointing to the UltiDevCassiniServerConfiguration.dll
you've just added. To do that switch to the Custom
Actions View of the Setup project and right-click on
Install, Rollback and Uninstall actions and select Add
Custom Action menu. In the Select Item dialog
navigate to the Application Folder\Bin folder and select UltiDevCassiniServerConfiguration.dll for each custom action:
The result will look like this:
At this point you hooked up Cassini's installer
class to setup project's custom installer
actions. Now you just need to pass application's registration information to the Cassini
Configuration module.
"Install" action requires several parameters, while
Rollback and Uninstall steps require only one parameter
- application ID. Application ID should be a unique
GUID. You can either generate a new GUID using MS Guidegen.exe utility, or better, just reuse an
UpgradeCode of your setup project. To get UpgradeCode
value of your setup project, bring up Setup project's
properties:
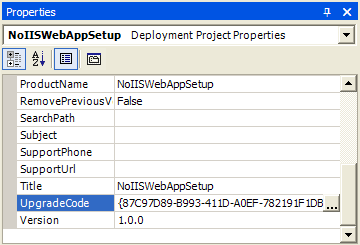
... and copy & paste the GUID
value in the Notepad for the use further in this
walkthrough.
To specify application ID for Rollback action, select
UltiDevCassiniServerConfiguration.dll under Rollback bin and set
CustomActionData property value to /AppID="<your
application ID>":
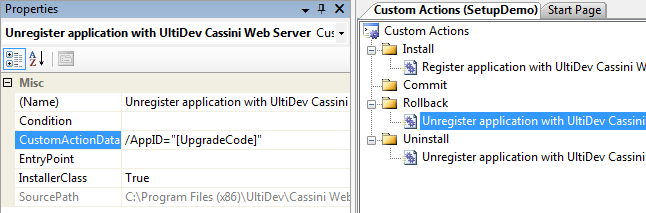
Then repeat the same for the Uninstall action.
CustomActionData values for Rollback and Uninstall steps
should be identical.
"Install" action has following parameters passed via
CustomActionData property:
| Parameter |
|
Meaning |
Example |
|
/AppID |
Required |
Application ID |
/AppID="{61526CD1-BBBE-4511-902D-EFE4A1E2845F}" |
| /AppLocation |
Required |
Physical
location of the application. Should always be set to
"[TARGETDIR]\". |
/AppLocation="[TARGETDIR]\" |
| /AppName |
Optional |
Application
Name |
/AppName="Test Cassini 2.0 Setup App" |
| /AppDescription |
Optional |
Application
Description |
/AppDescription="some useful text" |
|
/AppPort |
Optional |
Application
Port |
/AppPort="80" |
Don't specify the port explicitly if possible! Cassini
Explorer can redirect user's browser to the correct application URL by
application ID if you point the browser to
http://<machinename>:7756/GoToApplication.aspx?AppID=<your
application ID>.
Web service clients can too call Cassini Explorer web
service at http://<machinename>:7756/CassiniConfigurationService.asmx
to get your application's URL. |
| /AppDefaultDoc |
Optional if
default document is Default.aspx or
Index.htm |
Default
application document |
/AppDefaultDoc="WebForm1.aspx" |
|
/AppKeepRunning |
Optional |
Flag telling if
application should always be kept in memory for
quick first-page response. Default value is true. |
/AppKeepRunning="false" |
Here's the example of the Install action's
CustomActionData value:

At this point you can build the setup project. In
the process of building the setup package, three files
will be created: Setup.exe, Setup.ini and the MSI file
with the ASP.NET application. At this point you need to
replace Setup.exe generated by Visual Studio .NET 2003
with the one from UltiDev that contains Cassini
components (below we show hot to automate this process
of replacing original Setup.exe with Cassini's). Proper
Setup.exe is located in "C:\Program
Files\UltiDev\Cassini Web Server for Visual Studio .NET
2003 Developers"
folder. Just copy Setup.exe from there to the output
folder of your setup project and launch Setup.exe.
Setup.exe will check if UltiDev Cassini Web Server 1.1
redistributable components are installed and then
proceed with installation of the ASP.NET application.
After installation is complete, bring up Cassini
Explorer from the Programs | UltiDev program group and
ensure your application is registered with Cassini and
is working.
Uninstall the application and refresh the Cassini
Explorer to see the application gone. When you ship your
setup package to users, don't forget to include both Setup.exe and MSI
files because both have an important role in the
installation: Setup.exe installs Cassini,
and MSI installs your ASP.NET application.
Uninstalling the ASP.NET application will not cause
UltiDev Cassini to be uninstalled automatically. Your
application SHOULD NOT attempt to uninstall UltiDev
Cassini components, because other installed applications
may be dependent on Cassini presence.
It would be very inconvenient if you had to replace
default Setup.exe with Cassini Setup.exe manually after
every build. Setup projects in Visual Studio .NET 2003
do not have post-build events that would allow
automatically copy a file. To work around the issue
we'll add a bogus project to the solution with the only
purpose of using its post-build events for copying
Cassini's Setup.exe to the appropriate place. Class
Library project type will do just fine as it has
post-build events and can be made dependent on a setup
project.
Here's the what you need to do:
- Right-click the solution root item in the solution
tree and select Add | New Project.
- In the dialog select Class Library as project type and
give the project name !BuildProject (the '!' in the name
will make it the first project in the solution):
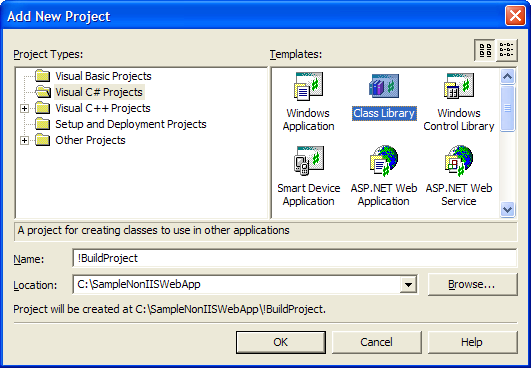
... and hit OK button.
- Remove all the default files from the !BuildProject as
they are not necessary.
- Make !BuildProject dependent on the setup project in
the solution so that post-build steps would execute
after setup project was already built. To do that,
right-click the solution root and click Project
Dependencies item. In the dialog window that popped up,
select !BuildProject from Projects dropdown and check
the setup project in the Depends On list.
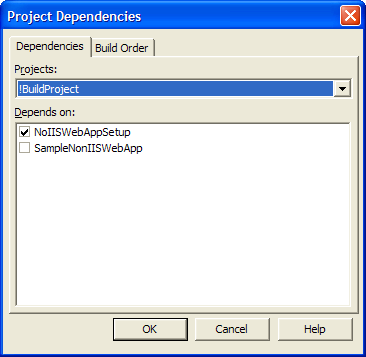
... click OK.
- Define !BuildProject's post-build event so that it
will copy Cassini's Setup.exe file over to the setup project's
output folder. To do that bring up properties of the !BuildProject
and put the following into the Post-build Event Command
Line:
copy /Y "%programfiles%\UltiDev\Cassini
for ASP.NET 1.1 Redist\Setup.exe" "..\..\..\<SetupProjectOutputFolderName>\$(ConfigurationName)\*.*"
and replace the highlighted placeholder with the actual
setup project name/folder name:
 ...and
hit OK button.
...and
hit OK button.
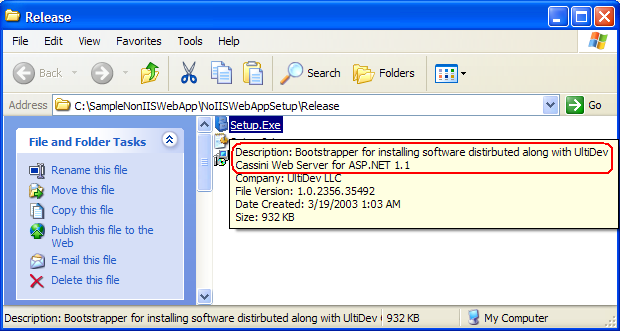
Now you are ready to build the solution. Right-click on
!BuildProject item and select Build. Once build is
complete, go to the setup project's output directory and
verify that Cassini's bootstrapper has been copied over
the original Setup.exe:
Since UltiDev Cassini Web Server components are packaged
inside the Setup.exe, you will need to ship all three
files: Setup.exe, Setup.ini, and the MSI file with your
application. Setup.exe requires .NET Framework to be
preinstalled. If it's not, Setup.exe will abort with an
error message.At this point you can test
the installation by running Setup.exe.
From this point forward the information
in this document
is not really related to application + Cassini
installation, but rather just a general helpful tip for
your non-IIS web application setup... -
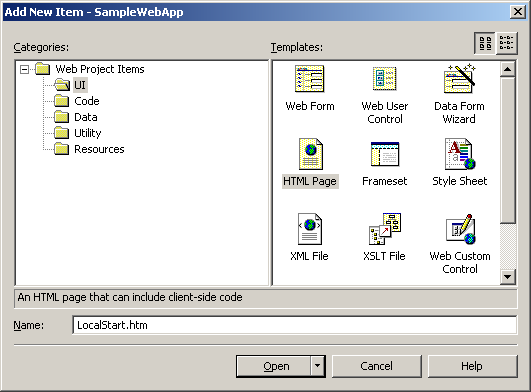
If you want to add a Programs menu shortcut to your application, please do the
following.
Add an Html Page file to your ASP.NET application project and call it LocalStart.htm.
Open the file in text editor and
replace its content with the following:
<!DOCTYPE HTML PUBLIC
"-//W3C//DTD HTML 4.0 Transitional//EN">
<html>
<head>
<title></title>
<meta
http-equiv="refresh"
content="0;url=http://localhost:7756/GoToApplication.aspx?AppID=87C97D89-B993-411D-A0EF-782191F1DBDD"/>
</head>
<body>
</body>
</html> Replace highlighted GUID with your application's
actual ID.
LocalStart.htm page contains "meta" tag that points
browser to GoToApplication.aspx page of the UltiDev
Cassini Explorer, and passes your application ID as a
parameter. Cassini Explorer will find port assigned to
your application and will redirect the browser
to it. This will always correctly invoke
your application even though the application will get
different ports assigned to it on different machines at
the registration time.
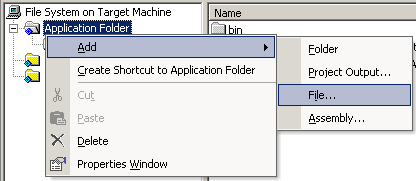
Now to work around some kinks of the setup project, add
the LocalStart.htm file to your setup project’s
Application Folder:
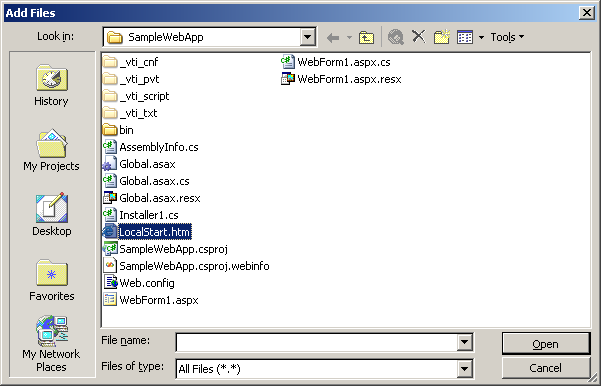
After that, right-click the LocalStart.htm file in the
right pane of the File System window of the Setup
Project and click Create Shortcut menu item.
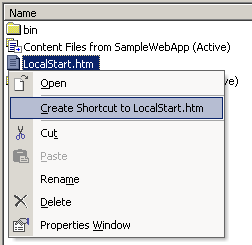
Rename the shortcut to reflect the name of your
application.
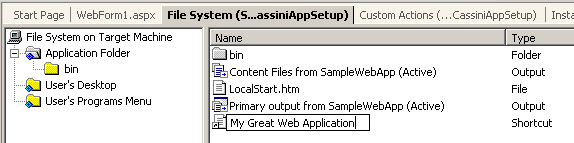
Drag & Drop the shortcut to the User’s Programs Menu.
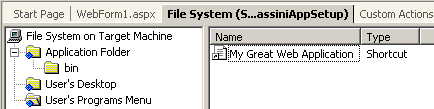
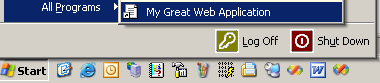
Build the solution and install your application. After
the installation you should see the shortcut in the
Programs menu.
Event though you probably know it already, Visual Studio .NET
setup projects often get their Detected Dependencies messed up
if you try to build the solution when your product is
installed. If your Detected Dependencies got out of
tune, uninstall your product, right-click the Detected
Dependencies folder in the Setup Project and do Refresh
Dependencies. After that all automatic dependencies
should get back to normal so you can build your
application with no problem.
If you need
additional information,
please visit our support forum,
where most common questions have been asked and
answered.
|