Purpose of This Article
This white paper is intended for developers and web site/application operators
who want to existing, already-deployed intranet web applications/web services
and local sites become accessible on the Internet in secure,
authenticated manner. This approach is very useful if you have any web site
that needs to be accessible to someone outside your local-area network, without
having to deal with all the headaches of in-house web hosting.
How HttpVPN™ Works
In the nutshell, HttpVPN™ makes web pages rendered by your local/intranet web
applications, appear on HttpVPN Portal
internet web site, where you and other authorized application end users log in to get
secure access to the apps. HttpVPN Portal forwards HTTP requests generated by
the web browsers to an HttpVPN Proxy that lives inside the same network where your
apps reside, and Proxy then forwards requests further to web apps, making your
app think that requests originated inside the LAN. After HTTP response was
created by your web app, it's sent to the Proxy, which replaces LAN-based URLs
on the page with Internet (Portal) based URLs and returns the response to the
Portal, where it's presented to the end user. When user clicks links on the
page, the whole round-trip is repeated again.
What You Need To Make It Work
Obviously, you will need an up & running local/intranet web site or application,
residing on a machine living inside a behind-the-firewall LAN.
You will need to download and install HttpVPN Proxy software on a Windows machine
that has
unmetered or unlimited broadband Internet connection and is
living inside the same LAN where your local/intranet app does. If your web
sites/applications run on Windows, you may (but don't have to) install the Proxy
on the same machine. If your applications run on Unix or other OS, you will need
to install HttpVPN Proxy on another machine (virtual machine will do) running
Microsoft Windows (XP SP2 or later).
In order to be able to install Proxy software, your Windows account has to have
Administrative privileges.
You will also need to create an account at the
Portal. This will
ensure that only you and people you authorize can access your applications.
Here we start the actual "how to" part of the article. Please follow these steps
to make your local/intranet site or application accessible on the Internet to
your and other people you authorize.
1. Create an Account at the HttpVPN Portal.
Start with creating an
account at the Portal. You can skip this step if you already have an account
with the Portal.
The 3-step account creation process includes usual stuff, like proving
you are a human being and not a hacker's software bot, providing your name and
setting up your username (email address) and password.
Once your account is created, a verification email is sent to the email address
provided as a user name. Verification is not required for most features, but
whenever money or payments are involved, only accounts with confirmed emails will
be allowed to pay or receive money. Also, after account was created, it's a good
idea to stop by at your
profile
page and add your birthday information, in case you want to have access to
content-restricted sites of other people, as well as to have access to
money-related features of HttpVPN.
2. Download and Install HttpVPN Proxy.
You can skip this step if you already an administrator of an HttpVPN Proxy
residing in this local-area-network.
From the Windows machine where you will install HttpVPN, please go the
HttpVPN Download page
and get the runtime version of the HttpVPN Proxy software. Run the
downloaded EXE to install the Proxy.
After HttpVPN Proxy software is installed, please run Start | Programs | UltiDev
| HttpVPN Web Hosting Proxy | Proxy Management Utility. The purpose of this program is to let you create Proxy's
identity and register the Proxy as belonging to you. These are the steps to take
once you have launched Proxy Management Utility:
- Say "Yes" when asked if the PC will be mostly-on. If machine with the Proxy is
turned off, your application will become inaccessible on the Web.
- Log in using Portal credentials. Your username and password are secure because
they are sent SSL-encrypted.
- When prompted to supply Proxy name, please enter a name that would be meaningful
as your local network name. For example, if you register the Proxy at home,
enter something like John's and Jane's Household; and if it's a business LAN,
enter something like Company-Sales-Proxy X. These types of names,
vs. "Proxy 1",
will be very helpful when you invite other people to access your apps, and they
will need to tell your Proxy from someone else's.
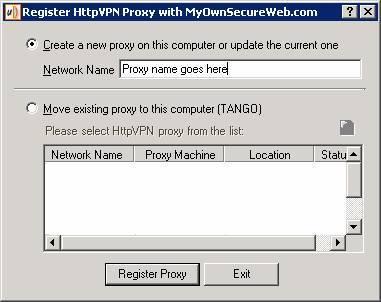
- Click Register Proxy button. After a brief delay you should get a message
saying that Proxy has registered successfully. At this point your Proxy has
obtained X.509 certificate-based identity known to the Portal as a legitimate
web app host.
- At this point if you log in to the Portal home page, you should see your
newly-registered Proxy and its status should be UP.
- This is it for HttpVPN Proxy installation and registration. It is now ready to
make your local sites and applications accessible on the HttpVPN Portal.
3. Make Your Local/Intranet Web Site or Application Accessible on the Web.
- Start with launching a web browser on the machine where Proxy is installed.
Point the browser to the URL of the web application you want to make accessible
on the Internet - just to make sure the Proxy will be able to reach the
application.
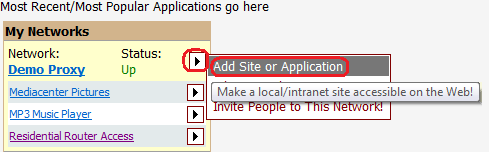
- Log in to the Portal,
hover the mouse over the
 icon next to the Status indicator of
the Proxy and click the "Add Site or Application menu" item: icon next to the Status indicator of
the Proxy and click the "Add Site or Application menu" item:
- You will land at the Application Properties page. In most cases here you will
need to specify just an application name and the URL by which Proxy can reach it
(see the first bullet of this chapter):
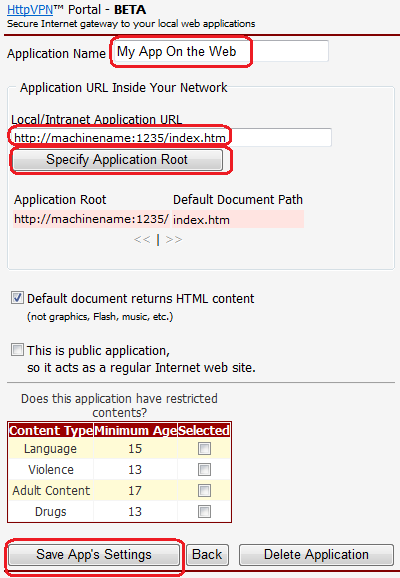
- To save application's settings you may either hit the "Save App's
Settings" button twice, or press "Specify
Application Root" button first, followed by
pressing "Save App's Settings" button. After that the
User Group List pane will appear on
the right side of the screen, but you can ignore it for now.
At this point you (and you only) can access the application on the Web at the
Portal. Hit Back button to go back to the
home page of the Portal - your application is there ready to rock-n-roll.
Well, almost ready - it takes a minute or two to propagate application
registration inf to propagate application
registration info to the Proxy. So please wait for a couple of minutes, and then
click your application link and enjoy secure Internet access to your
behind-the-firewall web site!
HttpVPN supports IIS web applications using NTLM or Kerberos windows
authentication. When a browser pops up login dialog box for such application,
the dialog box looks just like Basic/Digest authentication box - without domain
field. To work around this limitation, please enter user name in the
DOMAIN\USERNAME format. Since it's impossible to tell by looking at the
authentication popup box whether the web app requires Basic/Digest or
NTLM/Kerberos Windows authentication, users need to know whether the app uses
Windows authentication and if it does, enter credentials using domain\username
format.
HttpVPN allows browsers like Firefox that traditionally do not support Windows
authentication, to work with NTLM/Kerberos apps.

|
 |